At Ariax, we chose to feature BindCraft due to its state-of-the-art performance, ample external validation, and ease of use, as we highlighted in our introductory blog post and in our documentation. This tutorial will walk you through the practical details of running your first BindCraft campaign—from preparing your target structure to optimizing your job settings for maximum efficiency.
For a deeper technical dive, we highly recommend the official BindCraft wiki maintained by the authors, which you can find here.
Understanding the BindCraft Workflow
At a high level, BindCraft works through an automated loop of the core steps in modern protein design:
- Binder hallucination, which BindCraft accomplishes through backpropagation through AlphaFold2
- Binder optimization using ProteinMPNN
- Binder scoring using a combination of AlphaFold and Rosetta-derived metrics
The platform carries out this loop indefinitely until the desired number of "accepted designs"—optimized binders passing all in silico filters—is obtained (or until you pause/abort the job).
A major reason for BindCraft's effectiveness is its high standards: it typically rejects the majority of designs. This is the correct approach since wet lab testing far exceeds computational costs. The authors recommend generating 100+ accepted designs, then selecting the very best from those that pass filters.
The key takeaway: Configure jobs for efficiency to reach your target count within reasonable time and resource constraints.
Step 1: Configuring Your Target PDB File
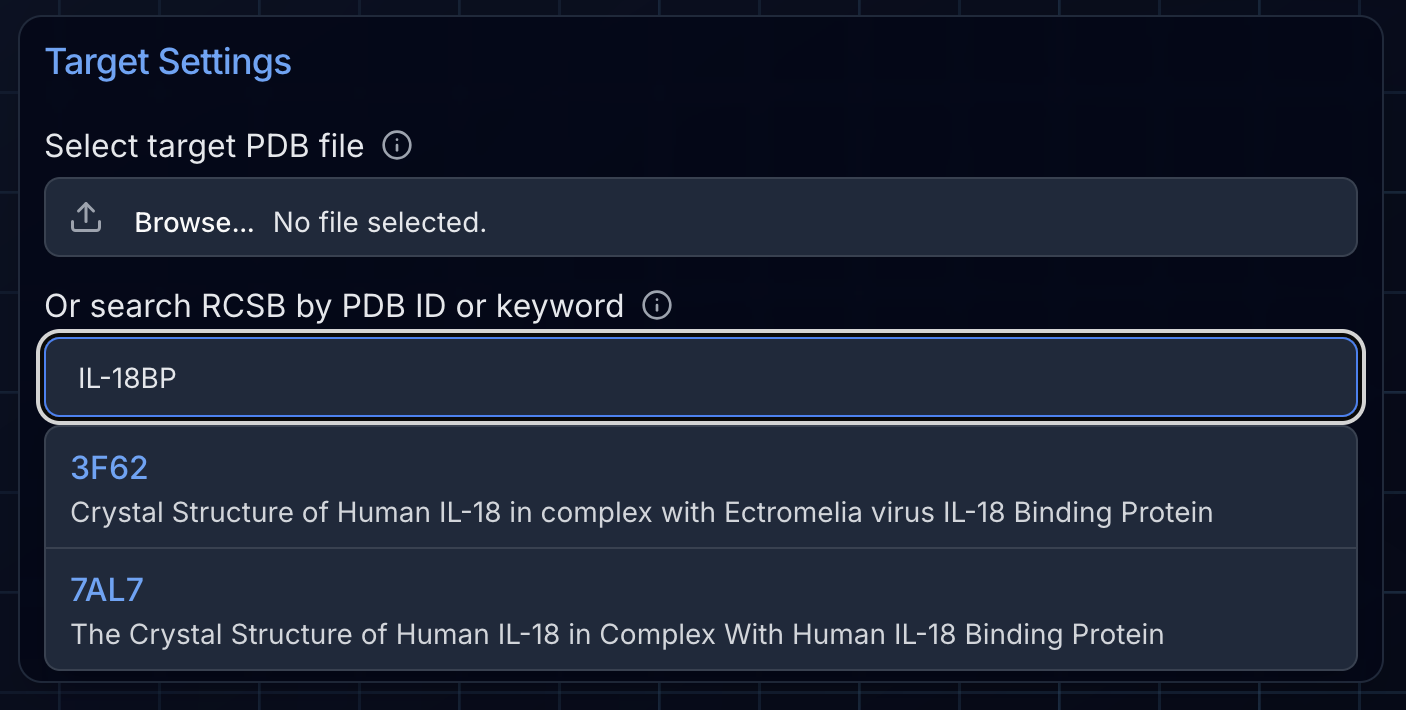
BindCraft requires that you supply the coordinates of your target in the form of a PDB file. If you don't know how to obtain a PDB file, you can use our handy search feature in the BindCraft job setup page. Ariax will automatically search RCSB, retrieve the PDB file, and parse the molecular assembly for you. Simply type the PDB ID code if you know it, or a protein name and a list of available structures will populate. For users who have their own PDB files, you can load them using the select file dialogue.

Pro tip: Try to trim down the target structure as much as possible for maximal computational efficiency. An ideal size is <300 amino acids. For proteins larger than this, more powerful GPUs are required that have more VRAM and the design process will be slowed. Very large protein assemblies (~750 amino acids or larger) may cause BindCraft to crash for GPUs with insufficient memory. We recommend a practical upper limit of ~500 amino acids if possible. When trimming, ensure you delete entire residues, as leaving partial residues or orphan atoms will cause errors.
Step 2: Select Chains and Configure Your Hotspot
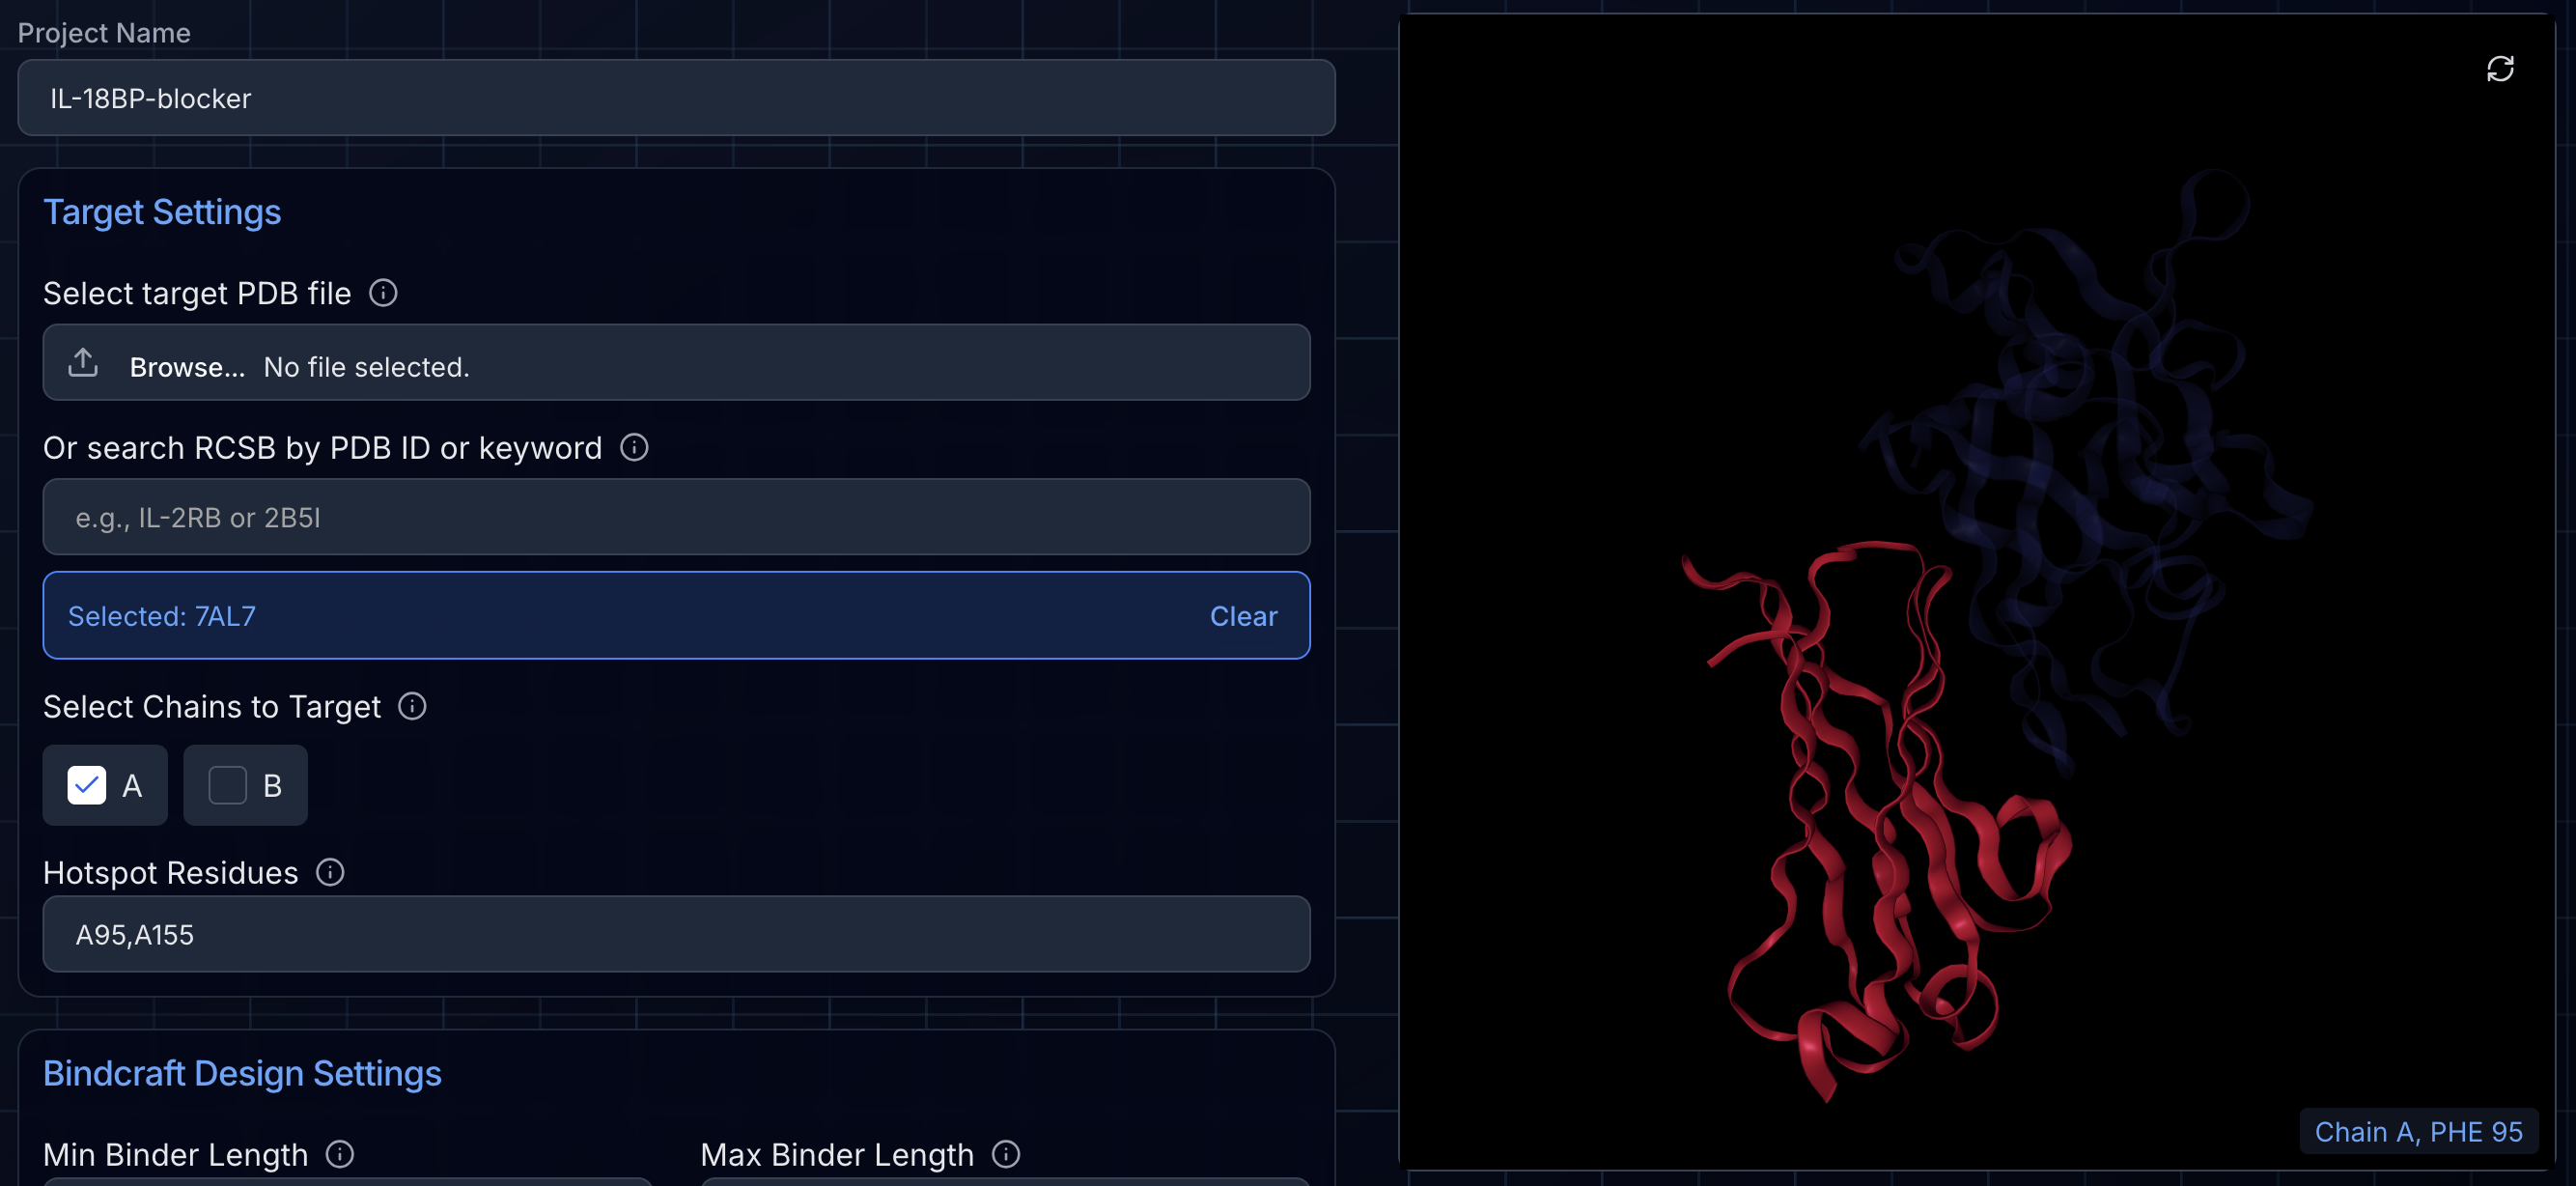
After the PDB loads, Ariax will detect all unique molecular assemblies (protein chains) in the file and display them in the NGLviewer window on the right. By default, all chains are selected. If you de-select a chain, BindCraft will ignore the chain as if it did not exist in the PDB file. In other words, it may place binder trajectories in the same location as the chain.
Once you have adjusted which chains will be considered in the design process, you can optionally set a hotspot for BindCraft to attempt to target. The format for entering a hotspot is to type the chain letter followed by the residue number (e.g., "A1,A3-5,B47-50"). Hotspots can be on one chain or multiple chains. To target an entire chain, enter the chain letter by itself (e.g., "A"). If you don't set a hotspot, BindCraft will target the most promising regions of the protein surface automatically. For best results, we recommend defining a patch of several surface residues. Ideal target sites often contain hydrophobic residues like Phenylalanine (F), Tyrosine (Y), Tryptophan (W), Isoleucine (I), Leucine (L), or Methionine (M).

Note: BindCraft will generally respect indicated hotspots, but in some circumstances if a highly energetically favorable binding site is present (e.g., large patches of surface-exposed hydrophobic residues), binders will be incorrectly placed at the wrong location. This happens because hotspot preference is part of a larger scoring function, and the algorithm may prioritize a different site if it satisfies all design criteria more optimally. We'll cover how to handle this situation in a future tutorial.
Step 3: Set BindCraft Design Settings
Here you'll specify the properties of the miniprotein binders BindCraft will create and the settings and filters it will apply in obtaining them.
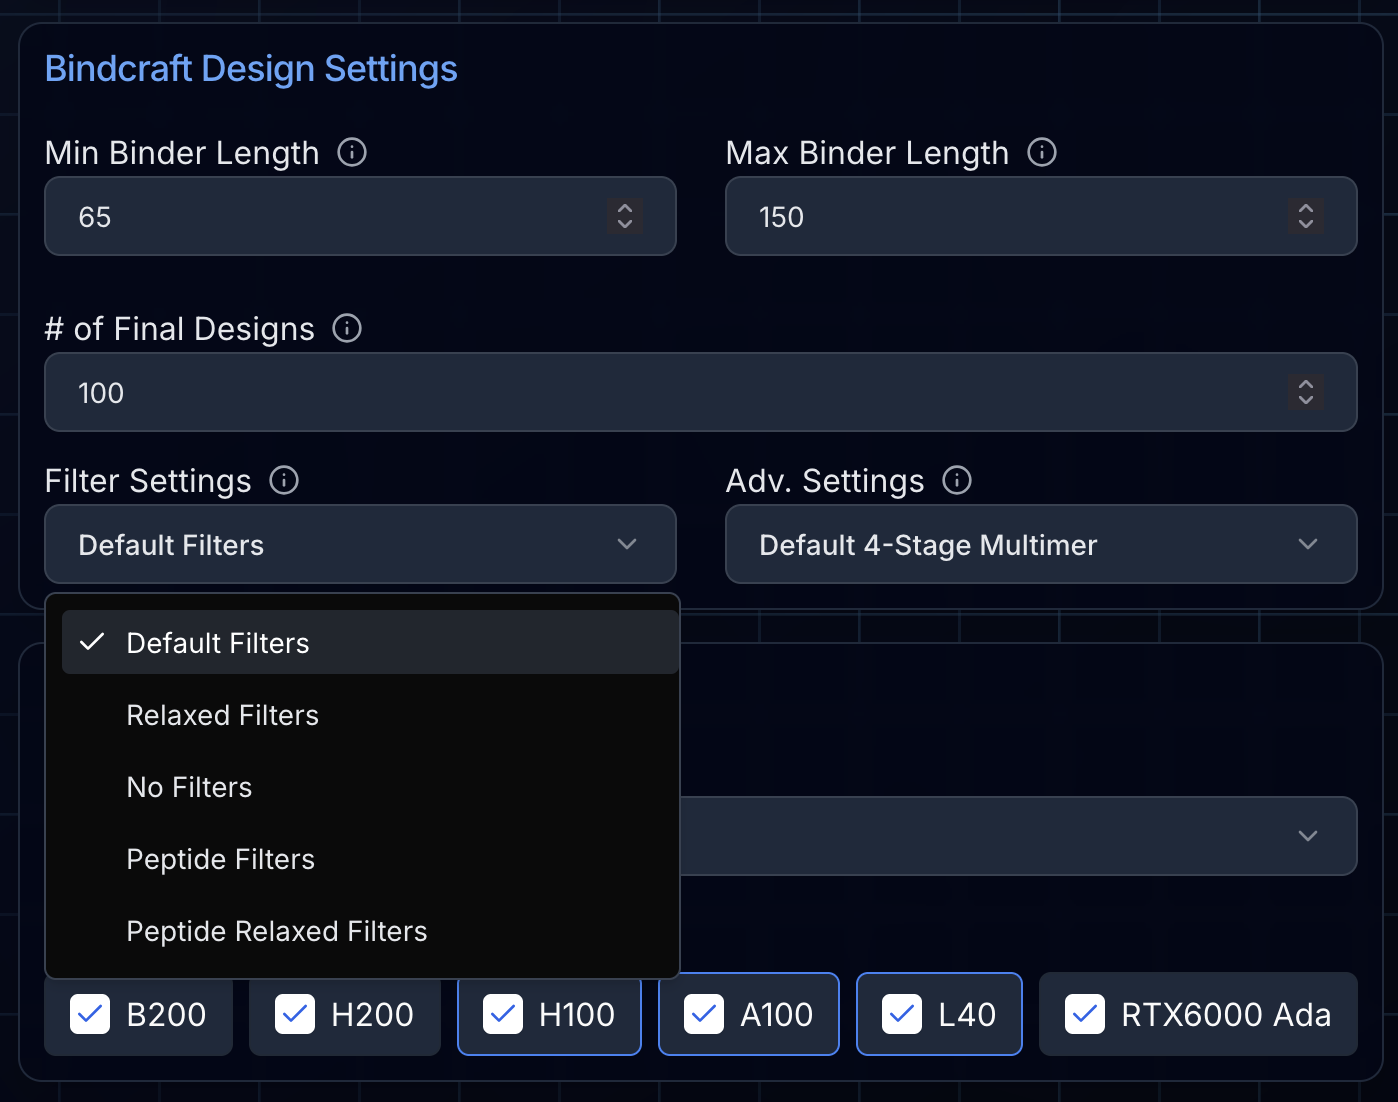
The first parameters to set are the minimum and maximum length of the designed miniproteins. The default settings are a minimum of 65 amino acids and a maximum of 150. The pipeline will generate binders with lengths randomly assigned between these values.
Next, you'll set the number of accepted designs BindCraft will attempt to create. The default here is 100. While this may seem excessive, BindCraft's high experimental success rates depend upon creating many designs and filtering down to the very best.

Choosing Your Filters
You'll need to choose the filters to apply to the generated designs. The "default" filters are the most stringent and the recommended starting point for most projects. "Relaxed" filters allow more designs through, at the trade-off of more experimental failures. For some target proteins and hotspots, BindCraft will only be able to generate accepted designs with "relaxed" filters. The "peptide" filters are optimized for peptide binders (designs with <30 amino acids in length). It's important to remember that none of the current computational metrics are predictive of experimental binding affinity; they are used to filter for high-quality candidates that are worth testing.
Advanced Protocol Settings
Finally, you'll need to set the design protocol in the advanced settings. Beyond the default settings which design predominantly helical miniproteins in a 4-stage protocol, you can also select "β-sheet" to favor miniproteins with β-sheet-containing secondary structure (though these often have lower in silico success rates), as well as a "peptide" design protocol that involves 3 stages.
On top of each of these base settings, you can also select the following options:
"Flexible" allows for greater target flexibility on both sidechain and backbone levels. This is useful when you have multiple domains and/or chains on your target that may be flexible and will increase the number of accepted designs. It may come at the cost of increased experimental failures.
"Hard target" uses an initial guess for the design of binders, increasing success with hard targets, but coming at the trade-off of potential bias in the designs (less diversity).
"MPNN" if selected, uses ProteinMPNN to redesign the binding interface between design and its target. By default, ProteinMPNN is only used at non-contact residues to optimize the stability of the initial designs created from AlphaFold2 backpropagation. When "MPNN" settings are selected, contact residues are included for MPNN optimization. The BindCraft authors generally recommend using the default settings for miniproteins and considering toggling MPNN for peptide binders.
Step 4: Choose Your GPU Preferences
At Ariax, we offer a large range of on-demand NVIDIA GPUs to power your BindCraft jobs, including the latest B200 (180 GB VRAM), H200 (141 GB VRAM), H100 (80 GB VRAM), A100 (40-80 GB VRAM), L40/L40S (48 GB VRAM), and RTX6000ADA (48 GB VRAM). Which GPU(s) you select depends on a number of factors:
First, consider the size of your target. For small proteins (150 amino acids and less), any GPU will work suitably well. As protein size increases (150-300 amino acids), more VRAM is needed for efficient design. Beyond 300 amino acids, the most powerful GPUs (H100+) are recommended. Jobs may stall or crash if VRAM is insufficient for your target size. As a general rule of thumb, a 32 GB GPU can handle a total complex size (target + binder) of about 550 residues, while an 80 GB card can handle about 950 residues.
Second, think about how fast you want to obtain the designs. More powerful GPUs will design proteins faster, particularly as protein size increases.
You can choose any combination of GPUs—from all available flavors to just one—but your selection must include at least one H100, A100, or L40 to satisfy our availability policies. You can also set your preferences that Ariax will attempt to apply when selecting GPUs, prioritizing "cost" (cheapest GPUs selected first) or "performance" (most powerful GPUs selected first).
Step 5: Validate Settings and Launch
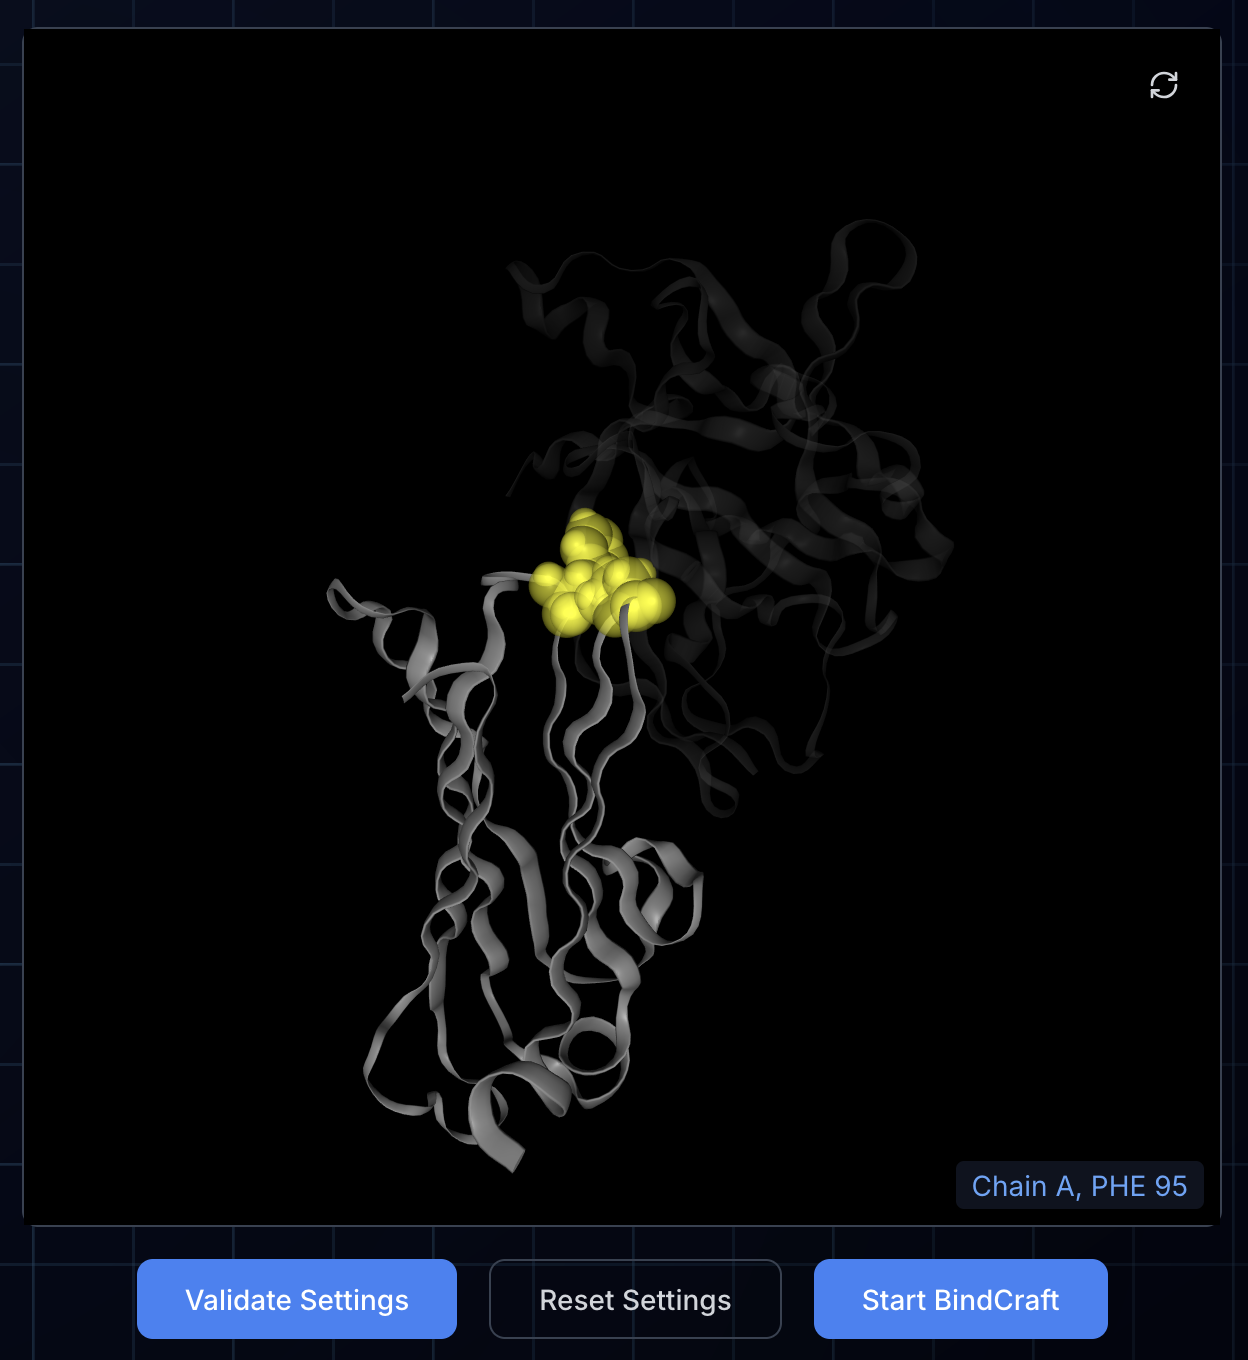
 Once you have configured the BindCraft job, press "Validate Settings". This will check that your chain and hotspot settings are correctly configured and also display the hotspot in the NGL viewer by highlighting the hotspot residues with yellow space-filling spheres. If there is an error, the reason will be indicated in the log display below. You can correct the error and press "Validate Settings" again to recheck the settings.
Once settings are successfully validated, you can press "Start BindCraft" to begin. After this button is pressed, your target PDB file will be uploaded from your computer to the cloud location where your BindCraft outputs will be stored, a cloud GPU will be provisioned and configured to run BindCraft using the settings entered. You'll be automatically redirected to the Project status page where you can view information about the job status and visualize and download the design outputs. You can reach this page any time from your dashboard.
General Tips for Success
Check the initial outputs after a few hours. When starting a new BindCraft campaign, monitor the outputs over the first 3-4 hours. Check that the first few trajectories (i.e., test designs that may or may not yield a final design) are binding to the intended region of your protein. Estimate the rate of accepted design creation and determine if it's acceptable for your timeline and compute budget.
Try a few job configurations to start. For more challenging targets, it's often a good strategy to launch a few design jobs at the same time with different settings (e.g., "relaxed" vs "default" filters; toggling "hardtarget" and/or "flexible" advanced settings). Observe which protocol(s) yield the best results after a few hours and pause or abort non-productive jobs. You can pool the results of concurrent jobs, so the resulting designs of paused/aborted jobs can still be used.
Try altering the hotspot and/or target PDB file. If BindCraft doesn't generate designs for your target even after trying multiple configurations, try adjusting the trimming of the PDB files. Similarly, try subtle adjustments to the hotspot residues selected. Minor changes can have a major impact on in silico design success rate.
Plan for experimental validation. The ultimate test is in the lab. For a typical campaign aiming for nanomolar-range binders, screening 10-20 of your best designs is often sufficient. If your goal is a more potent binder, we recommend screening a larger set of 50-100 designs.
What's Next?
This tutorial covered the fundamentals of running BindCraft efficiently. Future tutorials will dive into more challenging applications, including how to design binders against peptides in peptide:MHC complexes and creating miniproteins that target integral membrane proteins—both scenarios that require specialized approaches and careful parameter optimization.
BindCraft puts professional-grade protein design in every researcher's hands. With these guidelines, you're ready to create the next generation of therapeutic binders.
